Have you Googled yourself lately? Or, ever? I do it at least once a year, to keep tabs on my digital identity. What the Internet says about me might be somebody's first impression of me. It might determine if somebody is willing to work with me, or let me stay at their Air BnB for my vacation. This digital record of me is made up of all the things that I willingly put online and also things that I didn't.
I find something new each time. Today, I discovered that my name is listed at govsalaries.com along with my salary. I checked their site to see if I can ask to be removed, and I cannot. But now I am aware. During prior checks, I discovered that my name and contact information is listed publicly on the ASU website connected to a course that I teach.
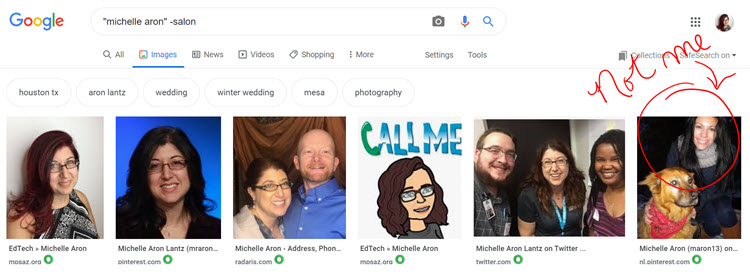
In addition to website results, I check the images. There is another Michelle Aron with a Pinterest account who looks enough like me that people might believe it is me, but luckily she hasn't posted anything inappropriate.
 |
| Checking my Google images results. Looks good! I recognize all of these images that I shared publicly, except one. |
I like doing this activity with teachers during in-person training because it's fascinating to see what they discover when they search themselves online. One teacher found that somebody was selling the answers to her university test questions. Another searched their teenager's name and found social media accounts they were not aware of.
How do I search myself online? For most of my life, I was Michelle Aron, so I start with that. I put quotation marks around "Michelle Aron" to eliminate getting results that have the name Michelle and Aron in separate places, since both are common first names. The Michelle Aron hair salon opened up a few years ago, no relation to me, but now when I search I also add "-salon" to eliminate those results. The terms you use to search will have an effect on your results:
When I search for "Michelle Aron" I get 7 pages of results, but without the quotation marks I get 10- so 3 extra pages of results unrelated to me that I eliminate with punctuation. "Michelle Lantz" (my new name) has 12 pages- but none of the results are me. "Michelle Aron Lantz" only has 3 pages but they are mostly me, since that is the name I have on my professional accounts, and it is unique. Your number of results will depend on your name. My son, who has an unusual name, has only two results. Not pages- links. He has been very careful about not revealing his real name online, so the only search results are to a newspaper article he was mentioned in when he was 7 years old. Now, he is almost 20 and has managed to keep his digital identity practically nonexistent. How?
He never reveals his real name online. He rarely uses social media, and when he does he uses a pseudonym. But this is not common. Most of us have an online presence. I do! As an educator and coach, my name is on the websites I create for work and the social media accounts I use. I want an online presence, and I want it to be a positive and professional one. In addition to searching myself periodically, I also set up Google Alerts. It's easy to do- simply go to https://www.google.com/alerts and enter your name. In theory, I should get an email whenever somebody uses my name online, but I don't get alerts for everything, so I still search myself.
I make additional conscious decisions every day to protect and curate my digital identity. I have separate social media accounts for my personal and professional life. My professional accounts are public and my personal accounts are set to the highest privacy settings. I have the same philosophy for posting on both: I only post something that I would be okay with the world seeing. And I ask for permission before sharing images or information about others. If I am unable to get permission, I don't post it, or I edit the photo so you can't see the person's face.
 |
| I put a smiley over this student's face because I didn't have his permission to share this photo. |
When I want to post pictures of ducks, my pets, or my family, I do that on my private, personal accounts. I only let people I know see those, so I am comfortable sharing them. Before I share information or pictures about other people, I ask their permission, even my spouse. I am aware that my profile and header pictures are public, even if my account is set to be private, so I choose those pictures carefully. Everything I post, I keep in mind, what do I want to world to see about me?
I post work-related pictures on my public, professional accounts. I like having that separation. There are people I follow for my professional learning network because I value their thoughts on teaching but I don't know them personally and I really don't want to see what they made for dinner or what their favorite team is doing. So I post my dinner pictures on my private accounts!
I am careful about who I allow to follow me on all of my accounts. I only want real people I know to see what I post on my private accounts. I use the highest privacy settings. On every account, I think about what I post, repost, follow, and like. Every action I make on social media is a reflection of me and my values.
I consider location settings. Snapchat, Facebook, and other services such as Google Accounts track and share your location, often by default. I check these settings and make sure they are turned off. I also check security settings periodically in case there have been changes.
On my personal Google accounts, I check the settings at myactivity.google.com. Yes, I have multiple email accounts. I have one email to share with people and services I trust- friends, family, banks, etc. I have another email to share with everyone else- store rewards cards, vendors at conferences, anybody I don't care to see in my regular Inbox. I consider this my "burner" email- one I would be fine with deleting if it were compromised.
Still, I don't want to have to delete it so I am careful with both accounts. I set up 2-Step Verification - an extra layer of security to ensure that even if somebody figures out my password, they can't log in to my account without a security code texted to my phone. I safeguard my phone number also- I usually share a "burner" Google Voice number instead of my cell phone number. I also don't answer my phone or respond to texts from unknown numbers.
I recently received a text message claiming to be from my bank, stating that my account had been compromised, and urging me to click to read the details. I did not click that link because it could have taken me to a fake site. Instead, I logged in directly to the bank's website and checked my account. It had not been compromised. I also searched for the phone number online, and it was not connected to my bank.
 |
| This is phishing! This was not from my bank. |
If I receive an unexpected message urging me to click a link, even if it is from somebody I know and trust, I don't click it. I ask the person directly (usually through an alternative method) if they shared the link with me. Sometimes it is legitimate, but most of the time, their account has been compromised and I am glad I didn't fall for it.
Besides phishing texts and emails, I get a lot of voicemails that are clearly people trying to get my personal information, and I ignore them. Recently I received a voicemail from a man that claimed to be from Arizona State University asking if I filed an unemployment claim and would I please call him back so he can make sure it's not fraudulent? I was initially skeptical, but I entered the phone number into Google Search to check if this was legitimate. It was- that number was on the university website along with his name. I called back, and was glad to be alerted to this fraudulent claim so I could report it.
If I am on a public wifi network, I don't log in to my bank or other secure sites.
I use a password manager to create strong passwords and remember them for me- securely. I never write passwords on paper. I usually don't allow my browser to save passwords.
I never log into my personal accounts on my work computer. If I absolutely need to, then I use an incognito window so my account information is not saved. If I need to login to anything while using another person's computer, I also use an incognito window to ensure that my login information doesn't get stored on their browser.
Before I share information online such as my name, address, phone number, social security number, birthdate, or credit card number, I make sure that it is a website that I know and trust. I look at "About" pages and privacy policies. I consider where I heard about the website. I also check two things in the URL address bar at the top of the browser before I share any information: a lock symbol and that the address starts with https, which means that it securely encrypts and protects data.
 |
| Always look for the lock symbol and "https" before sharing personal data on a website |
If I am unsure about a website I use my burner email and Google Voice number. Or I simply won't sign up. I have the power to choose what I share and who I share it with. Making careful, responsible choices allows me to enjoy the benefits of the Internet while protecting my identity and data.


